Rumah Dan Halaman (House and courtyard)

The Design of Installation about the collective community organic space based on compromisation and collaboration activities
(2016)
___________________________________________


The Collaboration Projects “Media Conscious” in Asia: Lifepatch ‘Rumah and Halaman’ is activities and installation exhibition at the end 2016 until early 2017 organized by Japan Foundation Asia Center and NTT InterCommunication Center [ICC] and held at ICC Gallery B5, Tokyo Opera City Tower, Shinjuku-ku, Tokyo. Within this project, The ideas of the installation and exhibition design were to talk about The Lifepatch and all its works as a collective that formed in 2012 in Yogyakarta – Indonesia. The things that closely related to all my experiences as a member of The Lifepatch.

icc-panorama-v-02b
The Exhibition Installation of Collaboration Project ‘‘Media Conscious in Asia”: Lifepatch ‘Rumah dan Halaman’

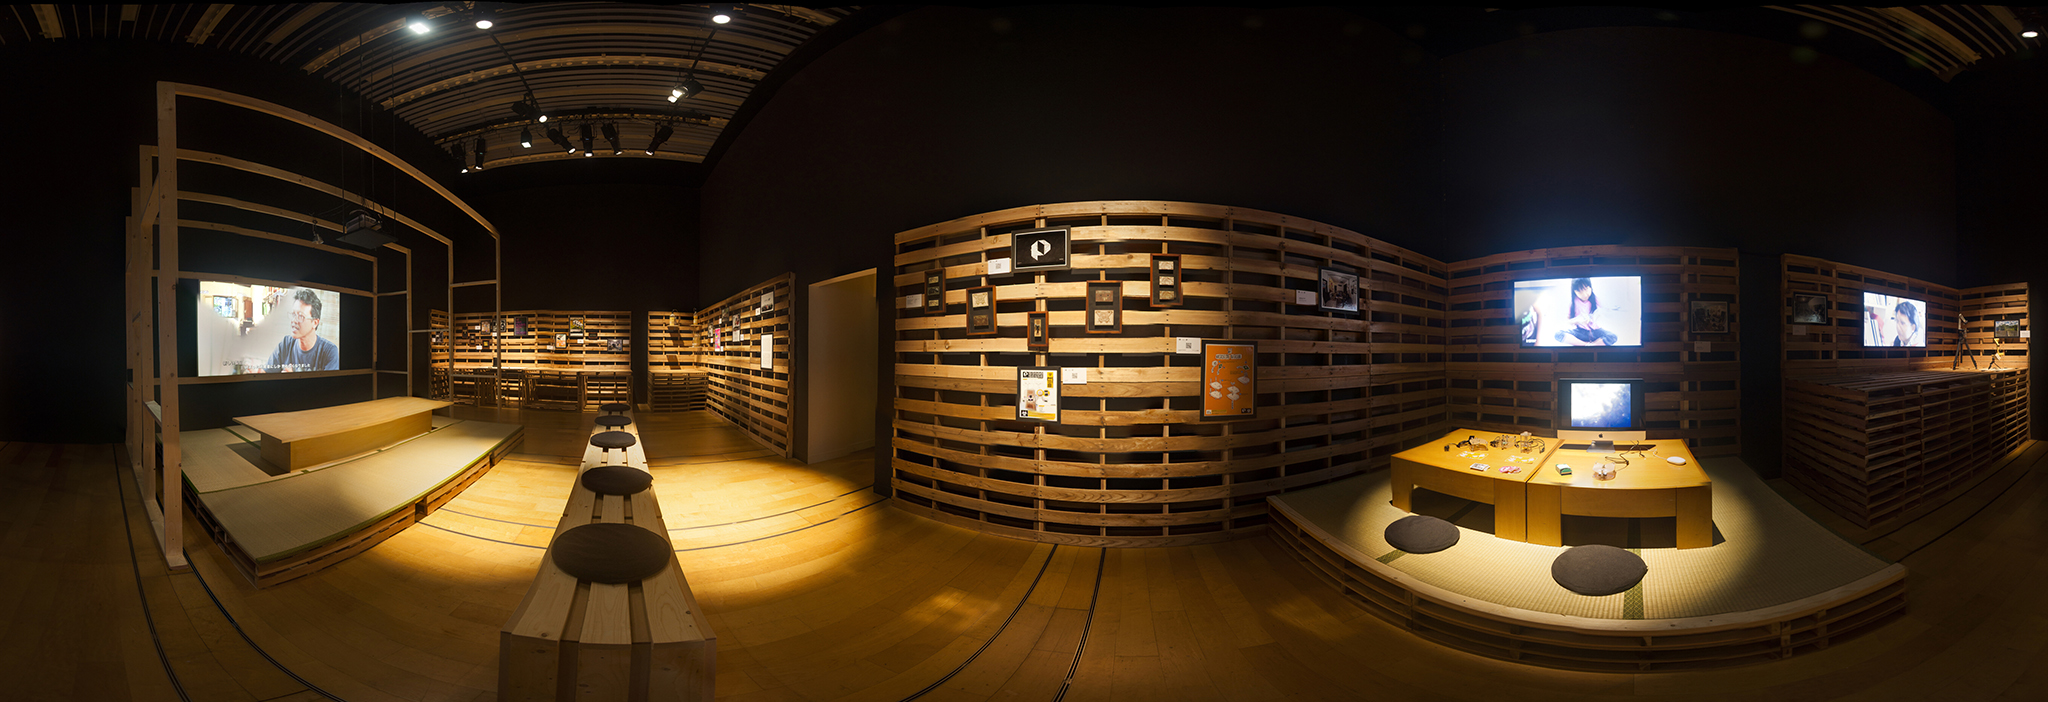
The Lifepatch is a collective community-based that has members with diverse interests and educational backgrounds, such as scientists, programmers, designers, artists, and curators. Since formed in Yogyakarta in 2012, they established a small house as their main place for works, conducts collaborative activities, and develops socially engaged projects related to art, science, and technology based on Do-It-Yourself (DIY) and Do-It-With-Others (DIWO) ethos. The place itself became an important space as a hub for individuals and communities to interact cooperatively through mutual learning, discussion, and meeting.

“Rumah” is an Indonesian word for the house. However, most people in Indonesia include Lifepatch, and many collective communities or organizations who use House as their main space aren’t describing the house as just a type of permanent physical structure with a particular function as a shelter or a Residential Building. There are several attributes that defining it as a “home”, such as self-consciousness, sense of belonging, histories, and a place where the dwellers practicing various ideas of better living concepts through simple hacking as an effort to survive.

When examining thoroughly to presents the works and all activities of Lifepatch, there seems to be a tendency to put The Rumah as The main space to work and interact cooperatively with individuals and communities. As a space of collective community-based, Rumah of Lifepatch also represents its dweller’s strategy as a collective when practising their methods of dwelling in a place where private and public as place values and function can be connected or separated. The first part that also being called “Rumah” is the main area with private value and protected by a particular structure of a building. Basically, Rumah is the representative of its dweller’s internal affairs, which is an organic space that always growing and slightly changing based on the dweller’s effort to organize, compromise, and collaborate with each other to meet all their basic needs, interests, and activities. The second part called the “Halaman” or the courtyard. This part is a transition space provided by the Rumah dwellers to make both of connector and barriers between the concept of private and public. As a connector, the Halaman Rumah is a place for the dweller to meet every external aspect of the Rumah. Contrary, Halaman also became barriers that provide by the Rumah dwellers to protect their private area and all of its internal aspect.

However, talking about The Rumah of Lifepatch as a space for collective community-based, there seems to be a tendency that the Rumah is not just a mere physical structure with a particular function, but as an organic space that lives and slightly changes when projecting the dweller’s lives and activities. Meanwhile, as a form of dialogue, it provides a creative environment within its spaces for its dwellers to conduct creative activities through the works and interaction between the collective members and other community.

The Rumah Dan Halaman (House and courtyard) installation was designed based on those concepts as the reimagination of Lifepatch space with all of its activities, and brought it all into an art gallery space as part of The Collaboration Projects’ “Media Conscious” in Asia between Lifepatch, Japan Foundation Asia Center and NTT InterCommunication Center [ICC].


Reference Site:
* Details of Collaboration Project ‘‘Media Conscious in Asia”: Lifepatch ‘Rumah dan Halaman’ Exhibition on Lifepatch official website
* Details of Collaboration Project ‘‘Media Conscious in Asia”: Lifepatch ‘Rumah dan Halaman’ on NTT InterCommunication Center [ICC] official website
* Details of Collaboration Project ‘‘Media Conscious in Asia”: Lifepatch ‘Rumah dan Halaman’ on Japan Foundation Asia Center official website

Go-Circle

The 360-Degree Panohead Prototype as the Do-It-Yourself (DIY) Photography tool
(2016)
___________________________________________


Go-Circle is a prototype of The Do-It-Yourself (DIY) 360-Degree Panohead developed by “Wawies” Wisnu Wisdantio [Lifepatch] and Stefanus Kushartanto [St. Joseph – The Carpenter]. Produced limited as a kit for Workshop – GoCircle: How To Make DIY 360-Degree Picture in ICC Gallery, Tokyo, November 13rd, 2016. Also displayed in The Collaboration Project ‘‘Media Conscious in Asia” : Lifepatch ‘Rumah dan Halaman’, which is an exhibition organised by Japan Foundation Asia Center and NTT InterCommunication Center (ICC) at ICC Gallery B5, Tokyo Opera City Tower, Shinjuku-ku, Tokyo.

The 360-degree picture is a spherical image that recording the photographer surrounding areas in only one image. Nowadays, it’s become very popular and easy to create by everyone only with the help of a particular app on a Smartphone or PDA. Before it became very popular, The 360-degree picture is very hard to make and need complicated process, especially when using a Pocket camera, Digital Camera, or an analog camera. Basically, producing a 360-degree picture only need to make serial pictures about 45-50 pictures from each spot location and then stitching all together. However, the tricky part is maintaining the point of view in exact same spot. If not, there will be a parallax between each picture point of view and made the serial picture very hard to be stitched each other. In order to reduce the parallax point, there is a particular tool as camera’s tripod addition called The Panohead that have to attach between camera and tripod. More than that, the photography tools tends to be very expensive and made not many people could afford or use it.

The rivers in Jogjakarta have significant historical, economic, and social importance. However, not many people in this city aware of those rivers’ importance. It’s only known as the backyard of the city, neglected, and rarely touched.

Triggered by the curiosity of some people who never visited those rivers, a walking trip through the river banks became an embryo of a long-term river environmental monitoring project called Jogja River Project that conducted by Lifepatch.id since 2012, with the idea to share all the knowledge that they found from the river as an open-source knowledge which can be easily understood by everyone. Part of it is making interactive documentation through 360-degree pictures that took from the river center in order to make anyone who saw it can feel how it’s like when they are in the middle of the river.

Facing a situation when the photographic equipment is expensive objects, brought me as a member of Lifepatch to make an experiment of making our own Panohead Tool, which is much cheaper and affordable. From 2013, the research conducted on a “trial and error” process based on the development of my knowledge that influenced by various sources, which is made me collecting several designs as results of the research that still evolving. The most recent design is made with an adjustment mechanism so it can be used with different types of cameras and tripods.


Undeniable, most people still thinking of making a 360-degree Panohead and a 360-degree picture still remains an activity that is not easy to do. Basically, the essential idea of making the Do-It-Yourself (DIY) photography tool is trying to decrease the gap between technology and its users through examination, exploration, research, and development. Within the Do-It-Yourself (DIY) ethos is a practice in order to stimulate new systems and styles of living and working that develop out of the creative process of individuals.

Beside of becoming part of The river monitoring project, The DIY 360-degree Panohead are also introduced to various community and children in schools as an educational project. The design and schematic of the DIY 360-degree Panohead are open sources and available at the public online with a creative commons license. Within  The Collaboration Project ‘‘Media Conscious in Asia”: Lifepatch ‘Rumah dan Halaman’, The DIY 360-degree Panohead was produced as a workshop kit on Workshop – GoCircle: How To Make DIY 360-Degree Picture in ICC Gallery, Tokyo, November 13rd, 2016.

Reference Site:
* Detail of The DIY 360-degree Panohead Research Documentation
* Details of the workshop and The description of Collaboration Project ‘‘Media Conscious in Asia”: Lifepatch ‘Rumah dan Halaman’ on lifepatch.org
* Collaboration Project ‘‘Media Conscious in Asia”: Lifepatch ‘Rumah dan Halaman’ on NTT Inter Communication Center [ICC] official website

360 Degree Panohead V.02B – Wood Version For Workshop And Exhibition On ICC Tokyo

Prototype of The DIY 360 Degree Panohead V.02B Photography Tools
(2016)
___________________________________________


The wood version of Panohead V.02B is a development version of The Panohead V.02 Design that was made limited only for Workshop – GoCircle: How To Make DIY 360-Degree Picture at ICC Gallery, Tokyo.
It’s a part of The Collaboration Project ‘‘Media Conscious in Asia”: Lifepatch ‘Rumah dan Halaman’, which is an exhibition as a collaboration between Lifepatch, Japan Foundation Asia Center, and NTT InterCommunication Center (ICC) that was held on ICC Gallery, Tokyo Opera City Tower, Shinjuku-ku, Tokyo.

The Development of Panohead V.02B design was based on the test result of The Panohead V.02 Design that was used to make 360-degree photos during the environmental monitoring project called The Jogja River Project. After being tested with Nikon D90 + 18-105mm lens and Canon EOS 60D + 18-55mm lens, The test results brought several points on the Panohead V.02 or could be called the Panohead V.02A that need to be repaired, which is focusing on the base material exploration and the vertical axis rotation mechanism.

Basically, The Panohead V.02B main structure is still based on the Panohead V.02A design that could be used with various types of cameras, lenses, and tripods just like the design of a commercial panoramic picture tripod head. It’s separated became 3 parts, which are part 1 plate as the nodal point horizontal adjustment plate, part 2 plate as the structural column for supporting the camera vertical rotation, and part 3 plate as the camera mounting and nodal point adjustment. The development that is applied to the Panohead V.02B design is focusing on the part 1 model as the horizontal adjustment plate and the joint mechanism between part 2 and part 3 as the nodal point of camera vertical rotation.

The part 1 design is changed to become a static plate as a railing track for the plate 2 horizontal movement to adjust the camera nodal point position. Besides that, The design of plate 2 also slightly changed on its connector with the part 1 plate, which is equipped with a connector block that made the horizontal movement doesn’t have to disturb the connection between the part 1 plate and the tripod mounting head.

Another enhancement that was made on the Panohead V.02B design is the joint mechanism between part 2 and part 3 as the nodal point of camera vertical rotation. it is supported by a gear mechanism to make the vertical rotation position easier to lock and adjusted.

The concept of Panohead V.02B design is developed based on wood material as a workshop kit for the Workshop – GoCircle: How To Make DIY 360-Degree Picture event in ICC Gallery Tokyo. Within the development itself, I made a small collaboration with “St. Joseph – The Carpenter” to build The DIY 360-Degree Panohead Workshop Kit.

The test of Panohead V.02B with Nikon D90 + 18-105mm lens conducted on the ICC Gallery B5, which is the exhibition space for Collaboration Project ‘‘Media Conscious in Asia”: Lifepatch ‘Rumah dan Halaman’ at ICC Gallery, Tokyo.

The Exhibition of Collaboration Project ‘‘Media Conscious in Asia”: Lifepatch ‘Rumah dan Halaman’
The Exhibition of Collaboration Project ‘‘Media Conscious in Asia”: Lifepatch ‘Rumah dan Halaman’ at NTT InterCommunication Center (ICC) Gallery, Tokyo Opera City Tower, Shinjuku-ku, Tokyo.


Go-Circle: How To Make DIY 360-Degree Picture – Workshop at NTT InterCommunication Center [ICC] Tokyo

DIY 360-Degree Panohead Photography tool Public Workshop
(2014)
___________________________________________


open-space-2016-media-conscious-poster

GoCircle: How To Make DIY 360-Degree Picture is a workshop as part of the Lifepatch Exhibition on Collaboration Project ‘‘Media Conscious in Asia”: Lifepatch ‘Rumah dan Halaman’ that was held on Nov 1st of 2016 until March 12 of 2017 at NTT InterCommunication Center [ICC] Tokyo. It’s a collaboration project between Lifepatch, Japan Foundation Asia Center, and NTT InterCommunication Center [ICC]. The workshop itself was held on Nov 13 of 2016 at ICC Gallery B5.

The workshop was talking about how to make simple DIY (Do It Yourself) 360-degree Panohead tripod and making panorama pictures with the Panohead tool. Nowadays, 360-degree photos as a spherical image of the photographer surrounding area became popular and easy to create with the help of a particular app on a Smartphone or PDA. But on the contrary, 360-degree hardware for Camera is expensive and not everyone can afford it. In this workshop, we will learn basic knowledge of 360-degree pictures, how to make the DIY 360-degree Tripod Panohead tools that affordable, and finally learn to produce serial pictures as basic material to make a 360-degree image. In this workshop, we will need a DIY Panohead kit, tripod, and various types of cameras, such as Pocket camera, Prosumer camera, DSLR.

Within the workshop on The Collaboration Project “Media Conscious’ in Asia”, I was part of Lifepatch make a small collaboration with “St. Joseph – The Carpenter” to built The DIY 360-Degree Panohead Kit, which is a Panohead that build limited that build based on the concept design of Panohead V.02B. Manufactured based on wood as the main material, this hardware version was made to support some from many types of cameras, such as Pocket Camera or DSLR. Besides that, it also could be attached to various types of tripods.

Reference Site:
* Details of the workshop and The description of Collaboration Project ‘‘Media Conscious in Asia”: Lifepatch ‘Rumah dan Halaman’ on lifepatch.org
* Collaboration Project ‘‘Media Conscious in Asia”: Lifepatch ‘Rumah dan Halaman’ on NTT InterCommunication Center [ICC] official website

Prologue: Dari Kehangatan Karpet Tebal Hingga Dinginnya Smoking Area

Berawal dari sebuah pilihan nekad di bulan November tahun 2014 lalu, meja pujasera di sudut halaman parkir Bandara Adisucipto menjadi tempatku, Widhi, dan Fitria untuk menunggu. Ditemani beberapa gelas es teh, makan pagi yang sangat terlambat, lembaran besar peta, catatan dan beberapa formulir aplikasi visa dan permit. Continue reading “Prologue: Dari Kehangatan Karpet Tebal Hingga Dinginnya Smoking Area”

Basic Travel Writing – Sharing With “Backpacker Dunia Jogja Jateng” Community

Community Gathering And Presentation Of Travel Writing
(2014)
___________________________________________


On the regular gathering of “Backpacker Dunia Jogja – Jateng” Community that was held in ACP Fruit and Coffee at 28 of June, I had a chance to make a small introduction about basic travel writing that I had been done with www.landscapeindonesia.com.

Within the sharing event, I talk about the basic definition of a travel journal, the easiest strategy to make small travel journal, research process during the trip, how to wrap all the experiences through travel journal, and then sharing it all in various methods such as made it as an e-book or small articles on an open-source articles website.

The presentation material


Referral sources for more detail information about the event:

Hivos – The Brain Grind Session, Stockholm, Sweden

Interdisciplinary Community Gathering Discussion And Presentation
(2014)
___________________________________________
Hivos Brain Grind Session


Hivos Brain Grind Session is a session that held by Hivos preceded by Creative Time’s Annual Summit at Stockholm, Sweden. Creative Time Annual Summit is the leading conference devoted to exploring the intersection of art and social justice, which are already held annually since 2009.

Preceded by its annual summit, Hivos invited a group of fifteen people who are all committed to this subject but come at it from different angles. I became a participant in The Brain Grind Session on behalf of Lifepatch member, which was as the attendant on Creative Time’s Annual Summit 2014 and became a participant in Hivos – Brain Grind Session.

The Process Documentation by Mthabisi Phili
 
The Participant List (Booklet)
 
The Presentation Material
 
Related articles and Reference:

Pepper’s Ghost Holographic Projector With Single Reflector V.01.2

Prototype of The Pepper’s Ghost Projector V.01.2
(2014)
___________________________________________


Pepper Ghost Holographic Projector With Single Reflector V.01.2 is the following up mini-experiment after the experiment of The Pepper’s Ghost Projector V.01.1. It’s a small experiment about how to make a projector tool to create a simple Pepper Ghost illusion that is quite popular to use in various performances since successfully implemented by John Henry Pepper on the theatre performance during the production of Charles Dickens’s “The Haunted Man” in 1862.


The Magic Lantern How To Buy And How To Use It and How To Raise A Ghost by “A Mere Phantom” (1876)

During the development of Pepper Ghost Projector V.01.1, there were several problems noted about the first model that need to enhance in the development of Pepper Ghost Projector V.01.2, which are the source image device position flexibility, the mirror effect of reflection that creates the ghost image as a negative image and the last note is about the transparent sheet thickness in order to make a proper ghostly image.

The first development is switching the cell phone position, which is moved from under the reflector structure to the top position, which allows the cell phone could change or move easily without disturbing the position of the projector box. At the same time, a mirror will be added as the reflector device’s new attachment and placed face by face with the cell phone, which is used to invert the source image as a negative image. Instead of reflecting the image from the actual source, the transparent sheet is actually reflecting the negative image on the mirror glass and inverting it back as a positive image.

The second repair made on the first model of Pepper Ghost projector is changing the former transparent sheet material in order to decrease the parallax that happened, which is replacing it with a 0.5 mm thick acrylic or plexiglass sheet.

The last arrangement is to make a box structure base on a new concept schematic and painted the box with a black matte colour to prevent the reflection of images from all the sides of the projector to the main screen.

The conclusion from the model of Pepper Ghost holographic projector V.01.2 experiment is working as expected. It already solves all problem notes on the V.01.1 model, which is successfully replacing the source image device position, the addition of a simple image inverting mechanism, and solving the last note with a new material thickness to decrease the parallax effect. At this point, although The Pepper Ghost Holographic Projector V.01.2 schematic model became the simple basic projector with a single reflector model for another development, it still has some development notes, such as:

  • The implementation of the inverting mirror will make the actual image reflected twice to create the ghostly image. It brought a distance effect between the reflector and its ghost image result, which made the ghostly image reflected or appear on the transparent screen projected seems far behind the box.
  • Each material has its own behaviour when reacting with lights, which will affect the pepper ghost result. During the experiment of pepper Ghost Holographic Projector V.01.2, the plexiglass sheet with 0.5 mm thickness that use to replace the former screen made the projection image result seems glowing. Furthermore, it became new knowledge that every material will develop various effects on the Holograph projection image.

Serial Perjalanan ke Finland & Switzerland (Bagian 1 dari 4) – Kota Di Tepi Laut Baltik

Kota Di Tepi Laut Baltik – Serial Dari Sudut Nordic Countries Hingga Konfederasi Switzerland – Bagian 1 dari 4

Langit sedikit berawan menyambutku di halaman Vantaa Airport. Sebentar kuhempaskan tubuh di bangku salah satu sudut airport sambil sekedar meregangkan sendi-sendi kaku. Inilah pertama kali aku merasakan duduk dalam lambung Airbus A340-300 selama 12 jam tanpa henti. Continue reading “Serial Perjalanan ke Finland & Switzerland (Bagian 1 dari 4) – Kota Di Tepi Laut Baltik”