Go-Circle

The 360-Degree Panohead Prototype as the Do-It-Yourself (DIY) Photography tool
(2016)
___________________________________________


Go-Circle is a prototype of The Do-It-Yourself (DIY) 360-Degree Panohead developed by “Wawies” Wisnu Wisdantio [Lifepatch] and Stefanus Kushartanto [St. Joseph – The Carpenter]. Produced limited as a kit for Workshop – GoCircle: How To Make DIY 360-Degree Picture in ICC Gallery, Tokyo, November 13rd, 2016. Also displayed in The Collaboration Project ‘‘Media Conscious in Asia” : Lifepatch ‘Rumah dan Halaman’, which is an exhibition organised by Japan Foundation Asia Center and NTT InterCommunication Center (ICC) at ICC Gallery B5, Tokyo Opera City Tower, Shinjuku-ku, Tokyo.

The 360-degree picture is a spherical image that recording the photographer surrounding areas in only one image. Nowadays, it’s become very popular and easy to create by everyone only with the help of a particular app on a Smartphone or PDA. Before it became very popular, The 360-degree picture is very hard to make and need complicated process, especially when using a Pocket camera, Digital Camera, or an analog camera. Basically, producing a 360-degree picture only need to make serial pictures about 45-50 pictures from each spot location and then stitching all together. However, the tricky part is maintaining the point of view in exact same spot. If not, there will be a parallax between each picture point of view and made the serial picture very hard to be stitched each other. In order to reduce the parallax point, there is a particular tool as camera’s tripod addition called The Panohead that have to attach between camera and tripod. More than that, the photography tools tends to be very expensive and made not many people could afford or use it.

The rivers in Jogjakarta have significant historical, economic, and social importance. However, not many people in this city aware of those rivers’ importance. It’s only known as the backyard of the city, neglected, and rarely touched.

Triggered by the curiosity of some people who never visited those rivers, a walking trip through the river banks became an embryo of a long-term river environmental monitoring project called Jogja River Project that conducted by Lifepatch.id since 2012, with the idea to share all the knowledge that they found from the river as an open-source knowledge which can be easily understood by everyone. Part of it is making interactive documentation through 360-degree pictures that took from the river center in order to make anyone who saw it can feel how it’s like when they are in the middle of the river.

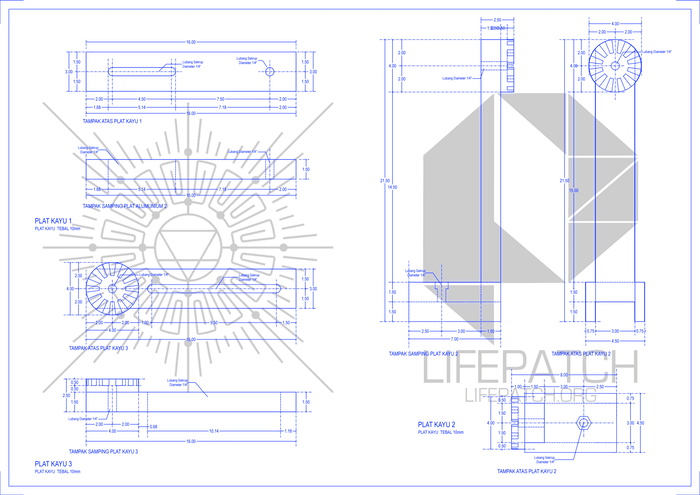
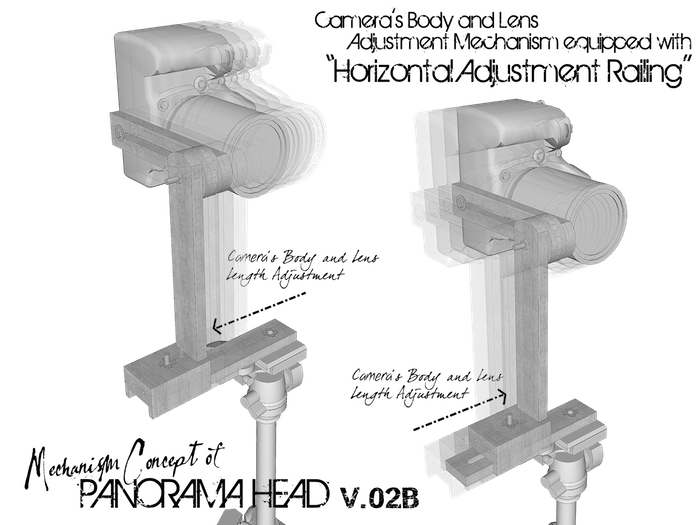
Facing a situation when the photographic equipment is expensive objects, brought me as a member of Lifepatch to make an experiment of making our own Panohead Tool, which is much cheaper and affordable. From 2013, the research conducted on a “trial and error” process based on the development of my knowledge that influenced by various sources, which is made me collecting several designs as results of the research that still evolving. The most recent design is made with an adjustment mechanism so it can be used with different types of cameras and tripods.


Undeniable, most people still thinking of making a 360-degree Panohead and a 360-degree picture still remains an activity that is not easy to do. Basically, the essential idea of making the Do-It-Yourself (DIY) photography tool is trying to decrease the gap between technology and its users through examination, exploration, research, and development. Within the Do-It-Yourself (DIY) ethos is a practice in order to stimulate new systems and styles of living and working that develop out of the creative process of individuals.

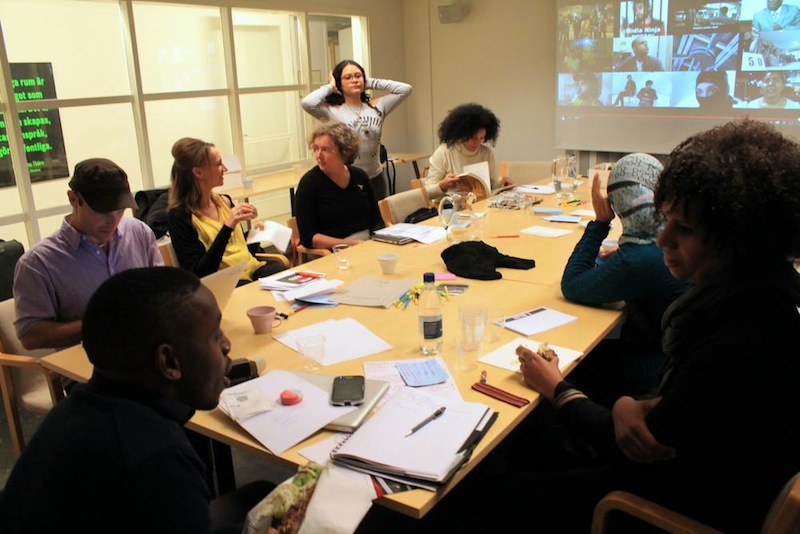
Beside of becoming part of The river monitoring project, The DIY 360-degree Panohead are also introduced to various community and children in schools as an educational project. The design and schematic of the DIY 360-degree Panohead are open sources and available at the public online with a creative commons license. Within  The Collaboration Project ‘‘Media Conscious in Asia”: Lifepatch ‘Rumah dan Halaman’, The DIY 360-degree Panohead was produced as a workshop kit on Workshop – GoCircle: How To Make DIY 360-Degree Picture in ICC Gallery, Tokyo, November 13rd, 2016.

Reference Site:
* Detail of The DIY 360-degree Panohead Research Documentation
* Details of the workshop and The description of Collaboration Project ‘‘Media Conscious in Asia”: Lifepatch ‘Rumah dan Halaman’ on lifepatch.org
* Collaboration Project ‘‘Media Conscious in Asia”: Lifepatch ‘Rumah dan Halaman’ on NTT Inter Communication Center [ICC] official website

360 Degree Panohead V.02B – Wood Version For Workshop And Exhibition On ICC Tokyo

Prototype of The DIY 360 Degree Panohead V.02B Photography Tools
(2016)
___________________________________________


The wood version of Panohead V.02B is a development version of The Panohead V.02 Design that was made limited only for Workshop – GoCircle: How To Make DIY 360-Degree Picture at ICC Gallery, Tokyo.
It’s a part of The Collaboration Project ‘‘Media Conscious in Asia”: Lifepatch ‘Rumah dan Halaman’, which is an exhibition as a collaboration between Lifepatch, Japan Foundation Asia Center, and NTT InterCommunication Center (ICC) that was held on ICC Gallery, Tokyo Opera City Tower, Shinjuku-ku, Tokyo.

The Development of Panohead V.02B design was based on the test result of The Panohead V.02 Design that was used to make 360-degree photos during the environmental monitoring project called The Jogja River Project. After being tested with Nikon D90 + 18-105mm lens and Canon EOS 60D + 18-55mm lens, The test results brought several points on the Panohead V.02 or could be called the Panohead V.02A that need to be repaired, which is focusing on the base material exploration and the vertical axis rotation mechanism.

Basically, The Panohead V.02B main structure is still based on the Panohead V.02A design that could be used with various types of cameras, lenses, and tripods just like the design of a commercial panoramic picture tripod head. It’s separated became 3 parts, which are part 1 plate as the nodal point horizontal adjustment plate, part 2 plate as the structural column for supporting the camera vertical rotation, and part 3 plate as the camera mounting and nodal point adjustment. The development that is applied to the Panohead V.02B design is focusing on the part 1 model as the horizontal adjustment plate and the joint mechanism between part 2 and part 3 as the nodal point of camera vertical rotation.

The part 1 design is changed to become a static plate as a railing track for the plate 2 horizontal movement to adjust the camera nodal point position. Besides that, The design of plate 2 also slightly changed on its connector with the part 1 plate, which is equipped with a connector block that made the horizontal movement doesn’t have to disturb the connection between the part 1 plate and the tripod mounting head.

Another enhancement that was made on the Panohead V.02B design is the joint mechanism between part 2 and part 3 as the nodal point of camera vertical rotation. it is supported by a gear mechanism to make the vertical rotation position easier to lock and adjusted.

The concept of Panohead V.02B design is developed based on wood material as a workshop kit for the Workshop – GoCircle: How To Make DIY 360-Degree Picture event in ICC Gallery Tokyo. Within the development itself, I made a small collaboration with “St. Joseph – The Carpenter” to build The DIY 360-Degree Panohead Workshop Kit.

The test of Panohead V.02B with Nikon D90 + 18-105mm lens conducted on the ICC Gallery B5, which is the exhibition space for Collaboration Project ‘‘Media Conscious in Asia”: Lifepatch ‘Rumah dan Halaman’ at ICC Gallery, Tokyo.

The Exhibition of Collaboration Project ‘‘Media Conscious in Asia”: Lifepatch ‘Rumah dan Halaman’
The Exhibition of Collaboration Project ‘‘Media Conscious in Asia”: Lifepatch ‘Rumah dan Halaman’ at NTT InterCommunication Center (ICC) Gallery, Tokyo Opera City Tower, Shinjuku-ku, Tokyo.


Go-Circle: How To Make DIY 360-Degree Picture – Workshop at NTT InterCommunication Center [ICC] Tokyo

DIY 360-Degree Panohead Photography tool Public Workshop
(2014)
___________________________________________


open-space-2016-media-conscious-poster

GoCircle: How To Make DIY 360-Degree Picture is a workshop as part of the Lifepatch Exhibition on Collaboration Project ‘‘Media Conscious in Asia”: Lifepatch ‘Rumah dan Halaman’ that was held on Nov 1st of 2016 until March 12 of 2017 at NTT InterCommunication Center [ICC] Tokyo. It’s a collaboration project between Lifepatch, Japan Foundation Asia Center, and NTT InterCommunication Center [ICC]. The workshop itself was held on Nov 13 of 2016 at ICC Gallery B5.

The workshop was talking about how to make simple DIY (Do It Yourself) 360-degree Panohead tripod and making panorama pictures with the Panohead tool. Nowadays, 360-degree photos as a spherical image of the photographer surrounding area became popular and easy to create with the help of a particular app on a Smartphone or PDA. But on the contrary, 360-degree hardware for Camera is expensive and not everyone can afford it. In this workshop, we will learn basic knowledge of 360-degree pictures, how to make the DIY 360-degree Tripod Panohead tools that affordable, and finally learn to produce serial pictures as basic material to make a 360-degree image. In this workshop, we will need a DIY Panohead kit, tripod, and various types of cameras, such as Pocket camera, Prosumer camera, DSLR.

Within the workshop on The Collaboration Project “Media Conscious’ in Asia”, I was part of Lifepatch make a small collaboration with “St. Joseph – The Carpenter” to built The DIY 360-Degree Panohead Kit, which is a Panohead that build limited that build based on the concept design of Panohead V.02B. Manufactured based on wood as the main material, this hardware version was made to support some from many types of cameras, such as Pocket Camera or DSLR. Besides that, it also could be attached to various types of tripods.

Reference Site:
* Details of the workshop and The description of Collaboration Project ‘‘Media Conscious in Asia”: Lifepatch ‘Rumah dan Halaman’ on lifepatch.org
* Collaboration Project ‘‘Media Conscious in Asia”: Lifepatch ‘Rumah dan Halaman’ on NTT InterCommunication Center [ICC] official website

Prologue: Dari Kehangatan Karpet Tebal Hingga Dinginnya Smoking Area

Berawal dari sebuah pilihan nekad di bulan November tahun 2014 lalu, meja pujasera di sudut halaman parkir Bandara Adisucipto menjadi tempatku, Widhi, dan Fitria untuk menunggu. Ditemani beberapa gelas es teh, makan pagi yang sangat terlambat, lembaran besar peta, catatan dan beberapa formulir aplikasi visa dan permit. Continue reading “Prologue: Dari Kehangatan Karpet Tebal Hingga Dinginnya Smoking Area”

Basic Travel Writing – Sharing With “Backpacker Dunia Jogja Jateng” Community

Community Gathering And Presentation Of Travel Writing
(2014)
___________________________________________


On the regular gathering of “Backpacker Dunia Jogja – Jateng” Community that was held in ACP Fruit and Coffee at 28 of June, I had a chance to make a small introduction about basic travel writing that I had been done with www.landscapeindonesia.com.

Within the sharing event, I talk about the basic definition of a travel journal, the easiest strategy to make small travel journal, research process during the trip, how to wrap all the experiences through travel journal, and then sharing it all in various methods such as made it as an e-book or small articles on an open-source articles website.

The presentation material


Referral sources for more detail information about the event:

Hivos – The Brain Grind Session, Stockholm, Sweden

Interdisciplinary Community Gathering Discussion And Presentation
(2014)
___________________________________________
Hivos Brain Grind Session


Hivos Brain Grind Session is a session that held by Hivos preceded by Creative Time’s Annual Summit at Stockholm, Sweden. Creative Time Annual Summit is the leading conference devoted to exploring the intersection of art and social justice, which are already held annually since 2009.

Preceded by its annual summit, Hivos invited a group of fifteen people who are all committed to this subject but come at it from different angles. I became a participant in The Brain Grind Session on behalf of Lifepatch member, which was as the attendant on Creative Time’s Annual Summit 2014 and became a participant in Hivos – Brain Grind Session.

The Process Documentation by Mthabisi Phili
 
The Participant List (Booklet)
 
The Presentation Material
 
Related articles and Reference:

Pepper’s Ghost Holographic Projector With Single Reflector V.01.2

Prototype of The Pepper’s Ghost Projector V.01.2
(2014)
___________________________________________


Pepper Ghost Holographic Projector With Single Reflector V.01.2 is the following up mini-experiment after the experiment of The Pepper’s Ghost Projector V.01.1. It’s a small experiment about how to make a projector tool to create a simple Pepper Ghost illusion that is quite popular to use in various performances since successfully implemented by John Henry Pepper on the theatre performance during the production of Charles Dickens’s “The Haunted Man” in 1862.


The Magic Lantern How To Buy And How To Use It and How To Raise A Ghost by “A Mere Phantom” (1876)

During the development of Pepper Ghost Projector V.01.1, there were several problems noted about the first model that need to enhance in the development of Pepper Ghost Projector V.01.2, which are the source image device position flexibility, the mirror effect of reflection that creates the ghost image as a negative image and the last note is about the transparent sheet thickness in order to make a proper ghostly image.

The first development is switching the cell phone position, which is moved from under the reflector structure to the top position, which allows the cell phone could change or move easily without disturbing the position of the projector box. At the same time, a mirror will be added as the reflector device’s new attachment and placed face by face with the cell phone, which is used to invert the source image as a negative image. Instead of reflecting the image from the actual source, the transparent sheet is actually reflecting the negative image on the mirror glass and inverting it back as a positive image.

The second repair made on the first model of Pepper Ghost projector is changing the former transparent sheet material in order to decrease the parallax that happened, which is replacing it with a 0.5 mm thick acrylic or plexiglass sheet.

The last arrangement is to make a box structure base on a new concept schematic and painted the box with a black matte colour to prevent the reflection of images from all the sides of the projector to the main screen.

The conclusion from the model of Pepper Ghost holographic projector V.01.2 experiment is working as expected. It already solves all problem notes on the V.01.1 model, which is successfully replacing the source image device position, the addition of a simple image inverting mechanism, and solving the last note with a new material thickness to decrease the parallax effect. At this point, although The Pepper Ghost Holographic Projector V.01.2 schematic model became the simple basic projector with a single reflector model for another development, it still has some development notes, such as:

  • The implementation of the inverting mirror will make the actual image reflected twice to create the ghostly image. It brought a distance effect between the reflector and its ghost image result, which made the ghostly image reflected or appear on the transparent screen projected seems far behind the box.
  • Each material has its own behaviour when reacting with lights, which will affect the pepper ghost result. During the experiment of pepper Ghost Holographic Projector V.01.2, the plexiglass sheet with 0.5 mm thickness that use to replace the former screen made the projection image result seems glowing. Furthermore, it became new knowledge that every material will develop various effects on the Holograph projection image.

Serial Perjalanan ke Finland & Switzerland (Bagian 1 dari 4) – Kota Di Tepi Laut Baltik

Kota Di Tepi Laut Baltik – Serial Dari Sudut Nordic Countries Hingga Konfederasi Switzerland – Bagian 1 dari 4

Langit sedikit berawan menyambutku di halaman Vantaa Airport. Sebentar kuhempaskan tubuh di bangku salah satu sudut airport sambil sekedar meregangkan sendi-sendi kaku. Inilah pertama kali aku merasakan duduk dalam lambung Airbus A340-300 selama 12 jam tanpa henti. Continue reading “Serial Perjalanan ke Finland & Switzerland (Bagian 1 dari 4) – Kota Di Tepi Laut Baltik”

Pepper’s Ghost Holographic Projector With Single Reflector V.01.1

Prototype of The Pepper’s Ghost Projector V.01.1
(2014)
___________________________________________


Pepper Ghost Holographic Projector With Single Reflector is a mini-experiment influenced by The “Return of Tupac Shakur” performance as a result of big collaboration production between Dr Dre’s production company and AV Concepts, which was utilizing the Musion® Eyeliner™ system in order to resurrect the late of Tupac Shakur as a 3D Holographic projection performing on stage with hip-hop music legends Dr Dre and Snoop Dogg at Coachella Valley Music & Arts Festival the Empire Polo Field on April 15, 2012.

Tupac Hologram Snoop Dogg and Dr Dre Perform Coachella Live 2012
courtesy of Snoop Dogg’s Official Channel on youtube.com at www.youtube.com/westfesttv

Musion™’s holographic projection system is a visual platform that is popularized by AV Concept in order to bring a new communication technique. It is presented as a live visual performance by transforming and combining Pepper’s Ghost optical illusion technique with an interactive 3D holographic video to develop a three-dimensional illusion that fools the audience’s brain into thinking of the illusion image as a real figure.

Musion SHOWREEL
courtesy of Musion Holograms Official Channel on youtube.com at www.youtube.com/musioneyeliner

*    *    *

Historically, Pepper’s Ghost is an illusion technique that was actually discovered around the 16th century by a scientist called Giambattista Della Porta on the Italian Peninsula. This illusion was re-discovered around 1862 by British scientist Henry Dircks who try to develop the Dircksian Phantasmagoria, a version of visual effects using glass and light for established or used to make a ghost appear on stage within the phantasmagoria performances. However, Dircks was unsuccessful in selling his idea to the theatre because it required rebuilding the theatres that were too complicated and expensive. Later after John Henry Pepper joined the project, he came up with an easy way to implement Dirck’s effect on the theatre performance during the production of Charles Dickens’s “The Haunted Man” in 1862. Since then, although John Pepper tries to share the credit with Hendry Dircks, this optical illusion technique became so popular to be called “The Pepper’s Ghost“.

The Pepper Ghost illusion is a form of visual hacking trick that involves the physical phenomena created by the law of reflection principles, such as the angle of the incident ray is equal to the angle of the reflection ray when hitting a flat mirror and the behaviour of light when travels to the spectator’s eyes as they view the image of a virtual object in a mirror. The appearance of the ghostly object in Pepper’s Ghost illusion is the reflection of an object hidden from the spectator’s sight view on a plat of glass or a sheet of plexiglass that is installed with a 45-degree angle and works as a mirror. Meanwhile, the transparency of glass or plastic allows the spectator to see a reflected “ghost” object while still being able to watch the environment behind the transparent surface. The other keys to the trick are lighting and the design of the hidden room where the actual “ghosts” are placed, which is entirely designed as a dark room and painted black. The main concept of the room design is to absorb the light and leave the actual “ghosts” as the only object that catches the light and will be reflected or appear on the glass.

The Magic Lantern How To Buy And How To Use It and How To Raise A Ghost by “A Mere Phantom” (1876)

Today, through the development of visual media technology, the source object that is reflected as the “Ghost” is replaced by high-quality video projection technology that combines motion capture technology and animation or Computer Generated Imaging (CGI), which allows people to bring the “digital doubles” of celebrities and political world leaders can be virtually projected and presented.

Holographic Projection Pepper Ghost setup with Christie projectors
courtesy of Glimm Display Official Channel on youtube.com at www.youtube.com/glimmscreens

*    *    *

Pepper’s Ghost Holographic Single Reflector Projector V.01.1 was developed as the first attempt to create a holographic projector based on the John Pepper illusion scheme and the design of AV Concept installation for Tupac Shakur performance, which is made as simple as possible and easy to make with common materials.

The first illusion experiment phase is the preparation of the objects that will be reflected as “the Ghost”. The actual ghost object is an image or an animated object that is designed based on John Pepper’s hidden dark room and the actual “ghosts” concept. The main objects that will be reflected or appear on the glass are made as a figure in white or bright colour on top of a black background, in order to make a transparent mirror that will absorb the low intensity of light from the black background and only catches or reflecting the high intensity of light from the actual “ghosts”. In the experiment, the easiest device to play or preview the image or animated object is a cellular phone, which is a quite common thing that can be owned by most people.

The second phase is the preparation of glass or transparent devices as the actual ghost image reflector. Based on the law of reflection, the object and the spectator have to be in a line and facing the mirror to make the spectator allows to see the object’s reflection. Therefore, the transparent mirror will be placed 45-degree facing both the image source and the spectator’s eyes.


During the experiment, the reflector model was made with a 3 mm thick acrylic sheet, which is built as a small box construction in order to be placed on top of the smartphone and cover all the display area.


The conclusion from the first model of Pepper Ghost holographic reflector V.01 experiment is spread to various results. As expected, the Pepper Ghost holographic projection from the “ghost” image is working well, which is only the white image that successfully reflected or appeared on the screen and the black part of an image absorbed and unreflected. However, there are still notes of some problems that need to be repaired, such as:

  • The position of the holographic projector that was placed on top of the cell phone as the image source made some minor problems because the cell phone isn’t flexible and hard to be moved when needed to change the source object.
  • The projection image that is reflected in the transparent sheet is a mirror image of the image sources or the negative image sources. Furthermore, to make the projection image become as same as its image sources, it needs a mirror device to make the projection appear as same as the source. If not, the image source has to make as an Invert object.
  • The acrylic thickness is made a distortion on the image projection, which is the audience’s eyes would be seeing the image projection become double. This happened because the screen is too thick and each of its sides projects its own image.