Pepper’s Ghost Holographic Projector With Single Reflector V.01.2

Prototype of The Pepper’s Ghost Projector V.01.2
(2014)
___________________________________________


Pepper Ghost Holographic Projector With Single Reflector V.01.2 is the following up mini-experiment after the experiment of The Pepper’s Ghost Projector V.01.1. It’s a small experiment about how to make a projector tool to create a simple Pepper Ghost illusion that is quite popular to use in various performances since successfully implemented by John Henry Pepper on the theatre performance during the production of Charles Dickens’s “The Haunted Man” in 1862.


The Magic Lantern How To Buy And How To Use It and How To Raise A Ghost by “A Mere Phantom” (1876)

During the development of Pepper Ghost Projector V.01.1, there were several problems noted about the first model that need to enhance in the development of Pepper Ghost Projector V.01.2, which are the source image device position flexibility, the mirror effect of reflection that creates the ghost image as a negative image and the last note is about the transparent sheet thickness in order to make a proper ghostly image.

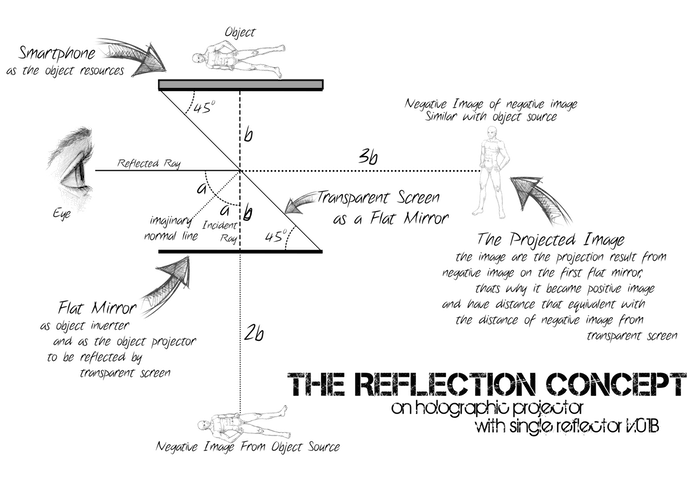
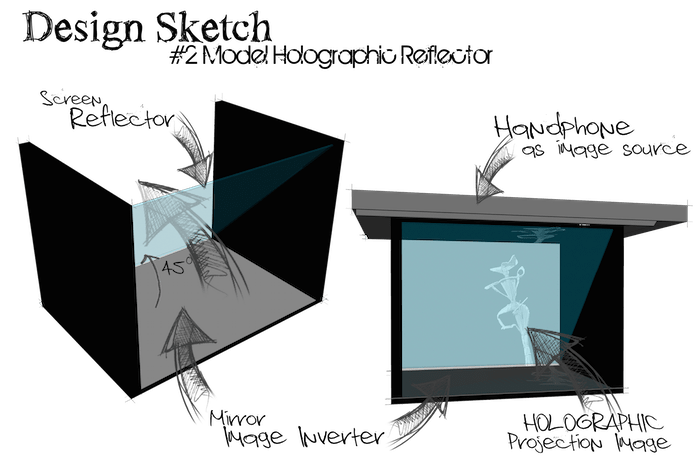
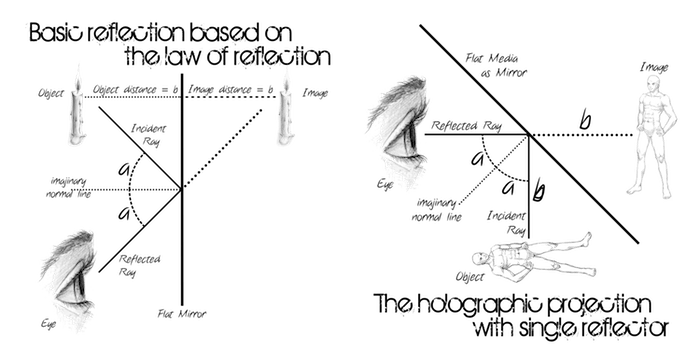
The first development is switching the cell phone position, which is moved from under the reflector structure to the top position, which allows the cell phone could change or move easily without disturbing the position of the projector box. At the same time, a mirror will be added as the reflector device’s new attachment and placed face by face with the cell phone, which is used to invert the source image as a negative image. Instead of reflecting the image from the actual source, the transparent sheet is actually reflecting the negative image on the mirror glass and inverting it back as a positive image.

The second repair made on the first model of Pepper Ghost projector is changing the former transparent sheet material in order to decrease the parallax that happened, which is replacing it with a 0.5 mm thick acrylic or plexiglass sheet.

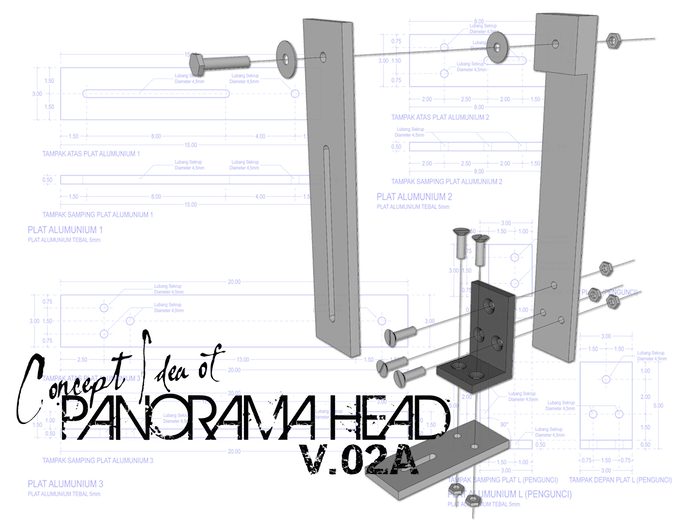
The last arrangement is to make a box structure base on a new concept schematic and painted the box with a black matte colour to prevent the reflection of images from all the sides of the projector to the main screen.

The conclusion from the model of Pepper Ghost holographic projector V.01.2 experiment is working as expected. It already solves all problem notes on the V.01.1 model, which is successfully replacing the source image device position, the addition of a simple image inverting mechanism, and solving the last note with a new material thickness to decrease the parallax effect. At this point, although The Pepper Ghost Holographic Projector V.01.2 schematic model became the simple basic projector with a single reflector model for another development, it still has some development notes, such as:

  • The implementation of the inverting mirror will make the actual image reflected twice to create the ghostly image. It brought a distance effect between the reflector and its ghost image result, which made the ghostly image reflected or appear on the transparent screen projected seems far behind the box.
  • Each material has its own behaviour when reacting with lights, which will affect the pepper ghost result. During the experiment of pepper Ghost Holographic Projector V.01.2, the plexiglass sheet with 0.5 mm thickness that use to replace the former screen made the projection image result seems glowing. Furthermore, it became new knowledge that every material will develop various effects on the Holograph projection image.

Pepper’s Ghost Holographic Projector With Single Reflector V.01.1

Prototype of The Pepper’s Ghost Projector V.01.1
(2014)
___________________________________________


Pepper Ghost Holographic Projector With Single Reflector is a mini-experiment influenced by The “Return of Tupac Shakur” performance as a result of big collaboration production between Dr Dre’s production company and AV Concepts, which was utilizing the Musion® Eyeliner™ system in order to resurrect the late of Tupac Shakur as a 3D Holographic projection performing on stage with hip-hop music legends Dr Dre and Snoop Dogg at Coachella Valley Music & Arts Festival the Empire Polo Field on April 15, 2012.

Tupac Hologram Snoop Dogg and Dr Dre Perform Coachella Live 2012
courtesy of Snoop Dogg’s Official Channel on youtube.com at www.youtube.com/westfesttv

Musion™’s holographic projection system is a visual platform that is popularized by AV Concept in order to bring a new communication technique. It is presented as a live visual performance by transforming and combining Pepper’s Ghost optical illusion technique with an interactive 3D holographic video to develop a three-dimensional illusion that fools the audience’s brain into thinking of the illusion image as a real figure.

Musion SHOWREEL
courtesy of Musion Holograms Official Channel on youtube.com at www.youtube.com/musioneyeliner

*    *    *

Historically, Pepper’s Ghost is an illusion technique that was actually discovered around the 16th century by a scientist called Giambattista Della Porta on the Italian Peninsula. This illusion was re-discovered around 1862 by British scientist Henry Dircks who try to develop the Dircksian Phantasmagoria, a version of visual effects using glass and light for established or used to make a ghost appear on stage within the phantasmagoria performances. However, Dircks was unsuccessful in selling his idea to the theatre because it required rebuilding the theatres that were too complicated and expensive. Later after John Henry Pepper joined the project, he came up with an easy way to implement Dirck’s effect on the theatre performance during the production of Charles Dickens’s “The Haunted Man” in 1862. Since then, although John Pepper tries to share the credit with Hendry Dircks, this optical illusion technique became so popular to be called “The Pepper’s Ghost“.

The Pepper Ghost illusion is a form of visual hacking trick that involves the physical phenomena created by the law of reflection principles, such as the angle of the incident ray is equal to the angle of the reflection ray when hitting a flat mirror and the behaviour of light when travels to the spectator’s eyes as they view the image of a virtual object in a mirror. The appearance of the ghostly object in Pepper’s Ghost illusion is the reflection of an object hidden from the spectator’s sight view on a plat of glass or a sheet of plexiglass that is installed with a 45-degree angle and works as a mirror. Meanwhile, the transparency of glass or plastic allows the spectator to see a reflected “ghost” object while still being able to watch the environment behind the transparent surface. The other keys to the trick are lighting and the design of the hidden room where the actual “ghosts” are placed, which is entirely designed as a dark room and painted black. The main concept of the room design is to absorb the light and leave the actual “ghosts” as the only object that catches the light and will be reflected or appear on the glass.

The Magic Lantern How To Buy And How To Use It and How To Raise A Ghost by “A Mere Phantom” (1876)

Today, through the development of visual media technology, the source object that is reflected as the “Ghost” is replaced by high-quality video projection technology that combines motion capture technology and animation or Computer Generated Imaging (CGI), which allows people to bring the “digital doubles” of celebrities and political world leaders can be virtually projected and presented.

Holographic Projection Pepper Ghost setup with Christie projectors
courtesy of Glimm Display Official Channel on youtube.com at www.youtube.com/glimmscreens

*    *    *

Pepper’s Ghost Holographic Single Reflector Projector V.01.1 was developed as the first attempt to create a holographic projector based on the John Pepper illusion scheme and the design of AV Concept installation for Tupac Shakur performance, which is made as simple as possible and easy to make with common materials.

The first illusion experiment phase is the preparation of the objects that will be reflected as “the Ghost”. The actual ghost object is an image or an animated object that is designed based on John Pepper’s hidden dark room and the actual “ghosts” concept. The main objects that will be reflected or appear on the glass are made as a figure in white or bright colour on top of a black background, in order to make a transparent mirror that will absorb the low intensity of light from the black background and only catches or reflecting the high intensity of light from the actual “ghosts”. In the experiment, the easiest device to play or preview the image or animated object is a cellular phone, which is a quite common thing that can be owned by most people.

The second phase is the preparation of glass or transparent devices as the actual ghost image reflector. Based on the law of reflection, the object and the spectator have to be in a line and facing the mirror to make the spectator allows to see the object’s reflection. Therefore, the transparent mirror will be placed 45-degree facing both the image source and the spectator’s eyes.


During the experiment, the reflector model was made with a 3 mm thick acrylic sheet, which is built as a small box construction in order to be placed on top of the smartphone and cover all the display area.


The conclusion from the first model of Pepper Ghost holographic reflector V.01 experiment is spread to various results. As expected, the Pepper Ghost holographic projection from the “ghost” image is working well, which is only the white image that successfully reflected or appeared on the screen and the black part of an image absorbed and unreflected. However, there are still notes of some problems that need to be repaired, such as:

  • The position of the holographic projector that was placed on top of the cell phone as the image source made some minor problems because the cell phone isn’t flexible and hard to be moved when needed to change the source object.
  • The projection image that is reflected in the transparent sheet is a mirror image of the image sources or the negative image sources. Furthermore, to make the projection image become as same as its image sources, it needs a mirror device to make the projection appear as same as the source. If not, the image source has to make as an Invert object.
  • The acrylic thickness is made a distortion on the image projection, which is the audience’s eyes would be seeing the image projection become double. This happened because the screen is too thick and each of its sides projects its own image.

360 Degree Panohead V.02A

Prototype of The DIY 360 Degree Panohead V.02A Photography Tools developed to support Lifepatch Jogja River Project (JRP)
(2014)
___________________________________________


Following the test of Panohead V.01 on environmental monitoring project called The Jogja River Project that was held on JRP – 2014, The Panohead V.02A was made with significant changes from the Panohead V.01 Design.

It developed based on better knowledge of nodal points and the “No-Parallax” position that could be found easily as a free source of knowledge at PanoTools.org Wiki, Beside of that, the Panohead V.02A already designed could be used for the various type or brands of cameras, lenses, and tripod just like the design of the commercial panoramic head.


Overall, The Panohead V.02A was made with an Aluminium plate that has 3 mm in thickness and wide around 3 cm. It separated became 3 parts, part 1 is used as a nodal point horizontal adjustment plate, part 2 is used as a structural plate, and part 3 is used as camera mounting and nodal point adjustment based on camera and lens type.

Learn from the experiences of Panohead V.01 development, the adjustment mechanism, and how it works perfectly after being tested with Nikon D90 + 18-105mm lens and Canon EOS 60D + 18-55mm lens during the Jogja River Project.

Some panorama pictures that were made with the Panohead V.02A

Schaffhausen - Switzerland
Schaffhausen – Switzerland
Suroloyo Peak - Kulon Progo
Suroloyo Peak – Kulon Progo
Wonosadi Sacred Forest - Gunungkidul
Wonosadi Sacred Forest – Gunungkidul

After the tool test with Nikon D90 + 18-105mm lens and Canon EOS 60D + 18-55mm lens, its needs to be repaired again with different materials or with different metal plate thickness. The note from the first test are:

  • the plate thickness was great, but when mounted on the tripod, the construction of the tool was a little bit shaking after being moved, particularly on the vertical structure plate. It’s might be happened because of the weight of the camera’s body and lens.
  • the circular point needs to repair or change with a different mechanism, which has grips to make it locked easier.

Hackteria: Biologische Kunst – Wissenschaft, Natur und Biohacking, Schaffhausen, Switzerland.

Interdisciplinary Community Gathering Talk And Presentation
(2014)
___________________________________________


Hackteria-Schaffhausen_Flyer_sm-1

Hackteria: Art Biology Science, Nature and Biohacking is a series of events organized by Marc Dusseiller and Hackteria International Community, in collaboration with Kunstverein Schaffhausen. All events are held in the Auditorium of Museum Zu Allerheiligen, Schaffhausen. Workshop and a series of panel discussions held for 3 days focusing on interdisciplinary activities of science and art

After five years since its inception, Hackteria | Open Source Biological Artis a global network that developed with the radical interdisciplinary approach emphasized on the ideas and methodologies in the field of BioArt, DIY biology‘, Appropriate Technology, Science Arts, and Bio-Hacking’. One focus of this project is hackteria.org, which is an online platform that provides a variety of information for artists, hackers/makers, researchers, and educators. In addition, through HackteriaLab 2010-2014, which is an event for 1-2 weeks is done regularly every year, participants from various countries meet and jointly perform a variety of collaborative practice through new projects as a medium to share knowledge through workshops and presentations. In the event which was held for 3 days in Schaffhausen Switzerland, divided into sections that everything is an explanation of the movement and the history of DIY and Open Hardware through discussions and hardware hacking activity.

“Wawies” Wisnu Wisdantio became this event participant on the behalf of Lifepatch member and also represent The Landscape Indonesia website. During one of the event phase called as “Hackteria Soirée: Nature, Art & Science”, which was a discussion on Bio Art, Biohacking and interdisciplinary, Wawies presenting an overview of the collaborations of Life Patch with Hackteria, BioDesign.cc and other partners in the JRP – Jogja River Project. In addition, he also talks about how amateur landscape photography could become tools for Landscape Indonesia” to share information about travel and environmental issues in an online platform website and produce the Free-Download E-photobook of Indonesia for Indonesians. Moreover, I’m just a little part of this event phase. Erich Berger (AT / FI) Finnish Society of Bioart, gives an insight Ars Bioarctica Residency program in Kilpisjärvi, Nord-Lappland, as well as various artistic commitment in relation to nuclear power in Finland, followed by the presentation of her latest book publication Field_Notes from Landscape to Laboratory – Maisemasta Laboratorion. Marc Dusseiller generally provides the project Hackteria | Open Source Biological Art before and gives an insight into HackteriaLab 2014 Yogyakarta, which he has co-organized this April in Indonesia. Boris Magrini (CH), an art historian, is making an attempt at the various topics presented, as well as the Bio Art in general, to summarise his view, as well as to position activism between contemporary art and Neomodernism. The audience is then invited to an open discussion moderated by Leo Bettina Roost and Boris Magrini.

The Presentation Material


Besides presentation and discussion, the other participants were also contributory to the success of this event series through experiment activities on field and laboratory to share their achievement in knowledge exploration. Some of the practical topics explored are the following:

Do-It-Yourself Microscope Workshop

“Make your own microscope webcam” workshop with Marc Dusseiller (CH) and Nur Akbar Arofatullah (ID)


Hackteria Listening Fields

Sound walk in Randen – Switzerland with Kaspar König (NL/CH), Pei-Wen Liu (TW/CH) and Christoph Stähli (CH)


Hackteria Natural Soundscapes

Experiment sound performance that inspired with the biological environment. The performance artist are Kaspar Konig – carte blanche, Pei-Wen Liu – The Philosophy of Constant Waiting (Chapter 7 Yogyakarta), Christoph Stähli – Noise and Nature, and collaboration of Marc Dusseiller with Yashas Shetty – Randen Listening Fieldscolaborasi

Referral sources for more detail information and documentation about the event:

Citizens Initiative On Environment Monitoring – unconference session presentation at the Camp Pixelache (Vartiosaari), Helsinki

Interdisciplinary Community Gathering Talk And Presentation
(2014)
___________________________________________


PA14_webflyer

Pixelache Helsinki (‘Pikseliähky’) is an electronic art and subculture festival that was being held in Helsinki since 2002. it has various programs, such as seminars, workshops, exhibitions, concerts and club events.

Since 2012, the festival themes have become quite diverse as well as the organizational of Pixelache. Pixelache Helsinki 2014 was an international 2-day trans-disciplinary event focusing on the theme of “The Commons”, including biocommons, urban culture, and the kinds of knowledge about The Commons.

Adding a new island to its logbook after Suomenlinna (2011) and Naissaar (2013), Camp Pixelache will take up residence on Vartiosaari, a nature island surrounded by eastern suburbs of Helsinki, during 6-8th June 2014.

I became a participant on Camp Pixelache 2014 on the behalf of Lifepatch member and also represent the Hackteria International Community to disseminate the HackteriaLab 2014 – Yogyakarta event that was held on April 15 – 30, 2014. In the unconference session presentation at the Camp Pixelache, I get a chance to present the research, mapping, and monitoring of the river in the JRP – Jogja River Project. Moreover, the presentation itself also contains the dissemination of the HackteriaLab 2014 – Yogyakarta event.

The Presentation Material
Became contributor at Camp Pixelache 2014: Remix the Commons video-mix

Remix the Commons is a collaborative and evolutive multimedia project. It aims at documenting and illustrating key ideas and practices of the commons movement, including the creative process of the project itself. During Camp Pixelache 2014 in June on Vartiosaari, Alain Ambrosi & Frédéric Sultan from Remix the Commons platform worked together with M-Cult,‘s Maria Candia and Kalle Kuisma to make recorded interviews & conversations with the Camp participants about how they defined the Commons, and about the gathering that was taking place.

Vartiosaari_2
Alain Ambrosi and his team from Remix The Commons documenting people sharing what the commons means to/for them, in their own language. Videos will be part of Define the commons project. http://www.remixthecommons.org – Description and Photo by Ong Jo-lene


Related articles and Reference:

360-degree panorama pictures of Lifepatch: Jogja River Project [JRP]

Interdisciplinary collaboration of environment monitoring at Jogja River Project
(2013 – Present)
___________________________________________


Jogja River Project (JRP) is a serial interdisciplinary collaboration project between various communities in Yogyakarta. Sincerely, during the first project that was held in 2011, JRP was an exploration expedition on the Yogyakarta river bank that was wide open for everyone who was willing to join and open share all the data during the exploration.

My first contribution to this project was on the third exploration trip on the Gajahwong River, on 20 May 2012, when was joined as the representative from The Landscape Indonesia community. From that exploration itself, I made a travel journal photo story and published it as a short article on www.landscapeindonesia.com with the title “Menelusuri Sungai Gajahwong Yogyakarta dalam Jogja River Project #3” (Exploring the Yogyakarta Gajahwong river at Jogja River Project #3).

In 2013, the Jogja River Project developed as a bigger project with 4 main activities, such as the development of the Bio-Electronic Laboratorium at the house of Lifepatch, making serial workshops about water sampling and visual documentation of the river environment, research activities through documentation and water sampling of Code river, and collaboration activities with various communities in Yogyakarta on Gajahwong river. Besides that, JRP also becomes part of the Bio Design for the Real World program. A collaboration project between Lifepatch, various communities in Yogyakarta, Microbiology Department of  Gadjah Mada Yogyakarta University (UGM), EPFL Switzerland and Shrishti School of Art, Design, and Technology, India. The main idea of The Jogja River Project and The documentation of the Jogja River Project 2013 process itself had been described in very detail on Lifepatch Website.

Within this big collaboration, I joined as a member of the visual documentation team and worked with Joan Prahara Bumi. In order to record The river environment condition as information that is easy to understand, we made a 360-degree panoramic picture of every water sampling location. To support the process, we made a small research to build a simple extension tool for our tripod, which is a homemade panoramic head that only costs approximately $1. Although still need enhancement, the tool itself that we called The DIY 360-Degree Panohead V.01 is already quite useful to support the process of environmental monitoring documentation.

The river environment condition documentation itself is conducted in about 20 locations that spread along the Code River, which are still in the administrative territory of Yogyakarta city.

Moreover, within the process, we produced raw pictures as material usually about 45-50 pictures from each spot location. From this point, all of those pictures became part and stitched all together and made the 360-degree picture.

jrp_2016_360_proses_01
The serial photos as the environmental documentation in each location that was previewed with Adobe Photoshop CS6

Within the process of 360-degree panoramic picture-making, the documentation team also make a collaboration with Budi Prakosa, Lifepatch member who is a programmer. In his hand, all the material pictures stitch together with PTGui, a panoramic stitching software that originally developed as a Graphical User Interface for Panorama Tools.

After that, all the 360-degree panoramic photos combined with all the data of river monitoring became part of an interactive map of the Code River environmental monitoring. The map itself is made as an online platform database with free and open-source software (LGPL) for information collection, visualization, and interactive mapping that is developed by a non-profit software company called Ushahidi, Inc.

Map Interactive

mapslifepatch.org from lifepatch on Youtube.com, a video that was made by Adhari Donora about user interaction with the Lifepatch Jogja River Project map.

In 2014, the project continues until nowadays. Within the process of the Jogja River Project 2014, the location of the water sampling and documentation process increased became 27 locations, which is conducted to make better documentation and wider data.

jrp-2014-spot

Meanwhile, to support the documentation process with better equipment that is still cheap and affordable, we start to develop the second version of DIY Panohead that is based on information from free source knowledge at PanoTools.org Wiki. With the DIY Panohead V.02 that only costs about 20$, the 360-degree documentation process conducts again at the same spot. A review of the DIY Panohead V.02 design process itself is already documented on the 360-degree Panohead page.

The Lifepatch documentation of the Jogja River Project 2016 by Adhari Donora


Related Article:
-“Menelusuri Sungai Gajahwong Yogyakarta dalam Jogja River Project #3
– 360-degree Panohead design process

Published On Local Newspaper:
TEKNIK FOTOGRAFI: TANTANGAN SERU PANORAMA 360 DERAJAT“.
The article that published in a daily local newspaper called Harian Jogja and Solopos on August 27, 2015. The article was written by Gilang Jiwana [Redaksi@jibinews.co]

Reference and Link External:
– Detail and description of Jogja River Project – lifepatch.org
– Detail and description of Jogja River Project 2013 – lifepatch.org
– Bio Design for the Real World  – EPFL + (Art)ScienceBLR +Lifepatch

Workshop of Camera Anatomy and how it works

Community Workshop Of Camera Anatomy
(2013)
___________________________________________


Poster_Workshop_Pengenalan_Anatomi_dan_Cara_Kerja_Kamera

A small workshop about camera anatomy and how it works that was held with Lifepatch on 2 June 2013. This open and free charge workshop discussed the camera elements and how it works as a photography basic learning.

All the participant learning every part of the camera anatomy, such as cameras body and lens introduction. Also learn how to use ISO, shutter speed, and camera aperture to capture any visual information through photography.

Reference Site:

* details of workshop description on lifepatch.id


360 Degree Panohead V.01

Prototype of The DIY 360 Degree Panohead V.01 Photography Tools developed to support Lifepatch Jogja River Project (JRP)
(2013)
___________________________________________


The experiment of 360-degree Panorama Tripod Head or usually also called Panohead started in 2013 as a documentation method on a big collaboration environmental monitoring project called The Jogja River Project – 2013.

The idea of documentation methods is to make an interactive picture of the river’s environmental condition in a 360-degree view to make the river condition easier to understand. Instead of buying the 360-degree Panohead tool that is very expensive and hard to find in a common camera store, Joan Prahara Bumi and I as the member of the visual documentation team try to develop our own Panohead as an extension tool to be mounted on the tripod head.

The very first autodidact attempt is just a super simple tool, which was designed with an aluminium plate 3 cm wide and 3 mm thick. This tool is used to adjust the camera in the “No-Parallax” position when attaching to the camera tripod, even though we doing it with super less knowledge about the “No-Parallax” position itself. This tool is made based on as far as we know that the nodal point of the “No-Parallax” position is at the front lens centre, which was made ONLY for a 50mm lens with Nikon D80 and Nikon D90. Sincerely, the length between the Nodal point on the tripod circular axle and the camera’s body connector is about 10 cm.


The prototype, as a result, had little few changes to the aluminium width which became only 2 cm. Besides that, we made small changes by adding rubber to make the connection between the aluminium plate and the camera’s body more stiff and fit, which was also useful as the camera’s body protection from scratch that could happen because of metal friction.

Furthermore, although this prototype was very simple, it’s already been used to make a panorama picture as part of the Jogja River Project that was held during 2013 – 2014.

All of the pictures that were made with the first version of the 360-degree Panohead can be seen as part of the information on water monitoring interactive map of The Jogja River Project.

Map Interactive

Sincerely, this experiment begins with the lack of knowledge and false understanding about the mechanical movement to maintain the nodal point and decreased the treats of parallax condition. It all brought a lot of notes to develop a better tool for the next version.

This version is working perfectly to maintain the nodal point only on horizontal movement, which is making a series of photos for panorama pictures in one line or a single row. However, it failed to maintain the nodal point when the process of making a bigger panorama picture, which had to make upper and under rows from the first row of the photo series. It happens because this V.01 prototype doesn’t have its own vertical rotation mechanism and depends on tripod vertical rotation, which was made each of the photo series in a single row has its own nodal point.

Public Discussion – Pergerakan: Warga Berdaya dan Yogyakarta yang sumpek

Public Discussion Of City Public Spaces Management
(2013)
___________________________________________


Poster Diskusi Publik

The focus of this discussion is the development and the rapid growth of the Yogyakarta city at the present time which has a major impact on the functional specialization of public space. Public Space Regulation and management became the starting point to maintain and develop the functional integration of the city’s public spaces.

It refers to the function of public space as the primary interaction connector between its citizen, which are also reflected in the culture of Yogyakarta city. The city regulation and management that neglect the function of the public space may lead restlessness of the people who really care about the development of their city.

This discussion talking about “Warga Berdaya” movements that were performed to criticise the government policies about regulation and management of public space in Yogyakarta. “Warga Berdaya” with various ways of direct actions in the public space demanded treatment and development of abandoned infrastructure.

Friday, May 10, 2013
Rumah IVAA (Indonesia Visual Art Archive) | Jalan IREDA, Gang Hiperkes 188 A / B
Panelist:
– Yoan Vallone – (Activists of Bicycle Community)
– Elanto Wijoyono – (Cultural Heritage Observer)
– Andrew Lumban Gaol – (Street Artist)
– Wawies Wisnu Wisdantio – (Architect)
Moderator: Yoshi Fajar Kresno Murti

Short version of video documentation on arsip IVAA

Full version of video documentation on arsip IVAA

Photo Documentation from other sources:

The Event on articles and news:
Tata Ruang Kota Jogja Bakal Dikritisi Seniman & Praktisi – Harian Jogja Online
Diskusi Publik – Pergerakan: Warga Berdaya Dan Yogyakarta Yang Sumpek (1) – Jogjanews.com
Diskusi Publik – Pergerakan: Warga Berdaya Dan Yogyakarta Yang Sumpek (2) – Jogjanews.com

Related Videos (no subtitles):
Serangan Umum Satu Maret, Rebut Ruang Kota Jogja! – youtube
Merthi Kutho #2: Serangan Umum Satu Maret – Rebut Ruang Kota Jogja –  arsip IVAA – youtube

Introduction of Basic Photography

Community Presentation And Workshop Of Basic Photography
(2013)
___________________________________________


Poster_fotografi_dasar

An introduction presentation about technique and composition on photography that could do with all cameras, such as a pocket camera, prosumer, and Digital Single Lens Reflection Camera.

This small presentation that was held with Lifepatch on 5 May 2013 is an open and free charge presentation, which is presented by me and Joan Prahara Bumi. It was discussed the camera elements and how it works as a photography basic learning. All the participant learning every part of the camera anatomy, such as cameras body and lens introduction. Also learn how to use ISO, shutter speed, and camera aperture to capture any visual information through photography.

Reference and Link External